How to Add an Expiration Date to Emails in Gmail
Do you want to know how to send an email in Gmail with an expiration date? Then stay with this post. This post will teach you how to add an expiration date for an email in Gmail. By doing so, your sent email’s content will automatically hide from the recipient’s email address once the set time completes. In simple terms, the recipient will not be able to access your sent email’s content after a set time. Let’s see how you can do it on your Gmail account.
Adding an expiration date for an email on Gmail on Mac and Windows
You will have to use the Confidential Mode feature of Gmail to set an expiration date. After adding an expiration date for an email, the email content will not be accessible to the recipient after a set time. Now let’s move toward the required steps.
- First, you have to sign in to your Gmail account through a web browser based on your device type like Windows 10 and Mac.
- After logging into your Gmail account, you have to hit on the Compose button located in the page’s upper left corner.
- After composing an email, mention the recipient’s email address, subject, and message content.
- Now look at the bottom of the same window and find and click on the lock icon containing a clock on the front. This icon is called the Confidential Mode feature.
- As you hit on the confidential mode icon, a new window will appear to set that email’s time.
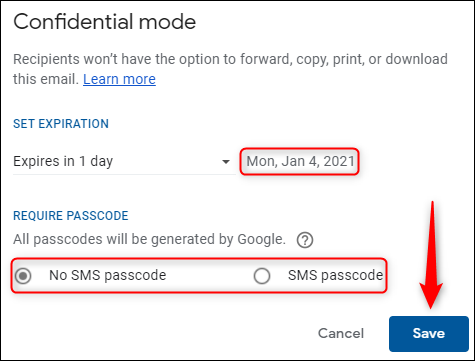
- Under the Set Expiration tab, click on the drop-down menu to see more options for setting expiration time.
- You will find an expiration time from one day to five years. Choose an expiration time by tapping on the one. A valid expiration date will display next to the chosen time.
- Additionally, if you want to set a passcode for that email, you can do the same. To do so, hit on the SMS passcode under Require Passcode tab. By doing so, it becomes mandatory for the recipient to use a passcode to access the email. The passcode is sent through a text SMS on the recipient’s mobile number. So, you will also be asked the recipient’s mobile number if you opt for the SMS passcode option.
- Finally, hit on the Save button in blue color.
- Now you have successfully set an expiration date for an email. You will see a message explaining the expiry date and the purpose of this setting.
- Hit the Send button to send the composed email. Once you send an email in confidential mode, the recipient will not be able to forward, copy, print or download the email after the expiration date.
- Additionally, if you want to limit access to that email before the expiration date, go to the Sent email tab, click on that email, and hit on the Remove Access option. Now the email access will be removed from the recipient account.
Adding an expiration date on iPhone, iPad, and Android
- Sign in to your Gmail account using your phone’s app. Then click Compose to prepare a new email.
- Prepare the email with the recipient’s email address, subject, and the message content.
- Now hit the three vertical dots on Android and three horizontal dots on other devices from the upper right corner and choose the Confidential mode option.
- Now set your desired expiration date.
- Like the desktop version, you can also use a passcode.
- After getting ready by doing the required settings, hit on the checkmark located in the upper right corner to finalize the settings. Now you can send the email with an expiration date.
- Like the desktop version, you can also restrict email access before the expiration date.
Blanche Harris is a very innovative person, and he always writes about the newest updates and subscriptions plan through mcafee.com/activate. He covers how you can enhance user skills. His blogs have been published on various websites, blogs and e-magazines.


Comments
Post a Comment